 Follow Us on Google News
 Follow Us on Google Discover
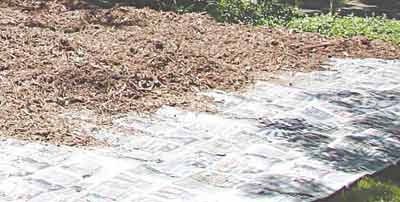
MAKE your bed” is one of the statements that we each must have heard a million times as kids.
As gardeners though, this simple phrase has a different meaning. “Make your bed” is about preparing the soil for planting. Every gardener gets excited by the thought of finally getting his/her hand in the soil and planting out the newest plant acquisitions.
The joy of finally getting to see the garden come together is a rewarding experience.
However, the key to success starts before the first plant even sees the garden, there are some simple steps you can take to get your beds and borders ready to be planted.
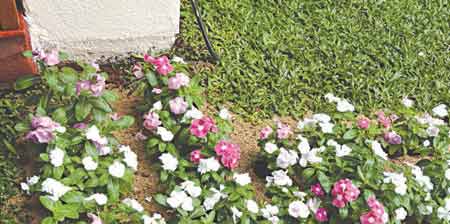
Creating New Garden Beds
Planting a new bed or border can really improve your garden. It is interesting to watch new plants grow and develop.
Beds and borders can also be useful to hide eyesores and add interest and colour.
Mark It
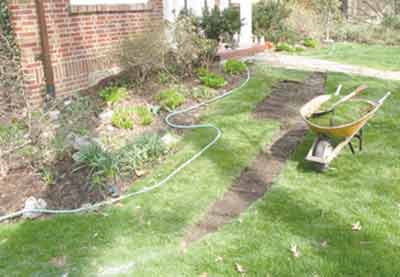
The best way to prepare is to define the outline of the bed. It can be helpful to use a garden hose to determine the outline of the bed.
A garden hose can be moved and reshaped until you find exactly the right shape and size of your bed.
Make your new garden the best it can be. Give it a fun shape with flowing curves or use it to echo the lines of your house. Get it just right by laying out a hose to outline your bed.
Once you have the perfect shape, make the edges with a line of sand or flour.
You can be more professional and mark out your bed by purchasing a can of marking paint designed specifically for painting lines on the ground.
You may even find cans of spray chalk, instead of paint for marking out the garden bed. My preference is to use the paint, because the lines will hold up better if they happen to get wet.
New Beds
When preparing a brand new bed or border, the first step is to kill the existing vegetation. If this is woody material, you will need pruners or perhaps, even a saw.
If the existing weeds are herbaceous plants, things like grass and chickweed, you will have an easier time.
Once you have the outline of the garden bed established, you will need to get rid of the existing grass or weeds in that area.
There are two methods- organic and chemical- and both are very effective.
Organic method
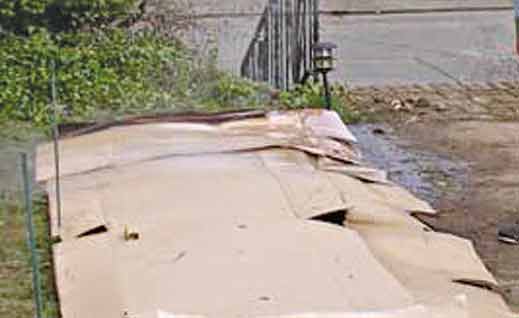
To kill the existing vegetation in your new garden spot, you will be amazed how simple and quickly you can achieve this task. All you need is a stack of newspapers or some old cardboard boxes.
If you are using cardboard boxes, remove any staples or plastic taping from the boxes, and the boxes should be flattened to make them just one long layer.
Use heavy cardboard that is not heavily coloured, or eight to 10 layers of newspaper. Newspapers these days are printed with soy-based ink, so the ink will not create a problem for the plants. But do avoid using glossy coloured inserts from newspapers.
Spread the layers of cardboard or newspapers over the entire garden bed area, making sure to overlap the edges so the grass beneath is completely covered, then cover it with several inches of topsoil or compost.
The cardboard or newspaper will smoothen the grass, prevent it from getting sunlight and from growing through your new garden bed. Wait a couple of months for the vegetation to die.
The beauty of this method is that it is so easy to accomplish, recycles material that nearly everyone has on hand and it is completely organic.
Over time, the paper and cardboard will moisture and disintegrate and become food for earthworms in your soil. By the time it disintegrates, the grass beneath the garden bed will be dead and any weed seeds that are buried deeply beneath the garden bed will have no chance of germinating.
Chemical Method – To Spray Or Not To Spray
IF you are ready to plant your bed soon and cannot wait the months required with the organic method, you can try the chemical method, using non-selective herbicide.
People who object to spraying usually do so because they believe the spray is harmful to the environment.
Glyphosate products (like Round-up) are supposed to break down into harmless elements quickly. Whether it is true or not is debatable.
In any event, an important advantage of spraying is that it will kill stubborn perennial weeds. If you only scrape the top, they will regrow from their roots.
Once Round-up has been applied in an area, leave that area alone for 72 hours, which is three days. Round-up is a systemic herbicide, meaning it has to be absorbed by the plant and translocated throughout the plant before that plant will die.
It takes three days for that to happen. If it should rain within 24 hours after the Round-up is applied, the chemical will wash off the plant and it cannot do its job.
So, watch the weather forecast, apply Round-up only when no rain is forecast for at least 24 hours. After Round-up has had a chance to work for three days, your garden bed project can progress.
Some herbicides can remain active in the soil for a period of time after application, so be sure to take this into consideration when planning your bed preparation and planting.
Once the existing vegetation is dead, use a tiller, spade/shovel or garden fork to turn the bed over. When working on the soil, you want the soil to be damp, but not wet. Working on soil when it is moist will help maintain a good air porosity and soil structure.
A tiller will often turn the soil to a depth of six to eight inches. It is good to get down to at least 12 inches (the depth of a spade or shovel), another point in favour of the shovel. If you are really motivated, turning over the soil to a depth of 18 inches is even better, though it is a lot of work. This is often called double digging.
Once you have turned over the soil, spread a layer of organic matter or compost two or three inches thick over the bed and then turn the soil over again to mix the compost into the soil.
The single best thing you can do for soil is to consistently add organic matter. Adding compost will improve the soil by adding nutrition and improving soil structure.
Remember that this organic matter gets used up each year and needs to be replenished to keep plants performing their best, so every new season, you want to add organic matter, as this will enrich the soil and help you grow better plants.