It is a common scenario: you snap a crucial moment, only to check your gallery and find the image is blurry, grainy, or frustratingly dark.
But don’t hit the delete button just yet.
Modern technology has made it easier than ever to rescue these “lost” shots directly on your phone. Whether you need a one-click miracle or professional-grade control, effective solutions are available. This guide starts with the modern “magic button,” Artificial Intelligence, and then covers manual techniques to upgrade your entire gallery.
Method 1: Use AI to Fix Blurry Photos
The “AI revolution” isn’t just a buzzword; it’s a game-changer for mobile photography. Unlike standard filters that just overlay colors, an AI photo enhancer can actually reconstruct an image. They are trained on millions of photos to rebuild lost details, remove grain, and sharpen blurry shapes.
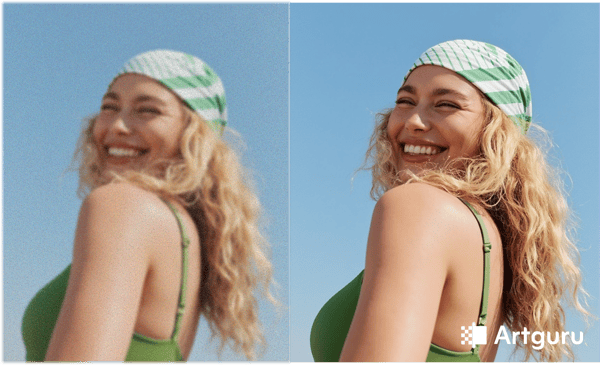
If you are looking for a reliable image enhancement tool to fix a photo online, Artguru is one of the most accessible tools currently available. It works directly in your mobile browser (Android or iPhone) and offers essential features to rescue your photos:
- Smart Upscaling: Got an old photo from a basic phone or a heavy crop that lost its sharpness? An advanced image upscaler doesn’t just stretch the pixels; it reimagines the missing details. It can upscale images to 2K, 4K, or even 8K, making faces, textures, and text significantly clearer.
- Instant “De-blurring”: This is ideal for unblur image ruined by shaky hands or low light. You upload the blurry photo, and the tool analyzes the defects to restore sharpness. The results often beat what you could achieve with hours of manual editing.
- Bonus Features: Artguru goes beyond basic restoration, offering extras like a one-click background remover, which is perfect for profile pics or product listings.
Just keep in mind that while AI feels like magic, it has limits. If a photo is completely ruined, the AI might “invent” details, resulting in waxy skin textures or unnatural features. It works best for enhancing decent shots, not performing miracles.
Method 2: Adjust Camera Settings Before Shooting
The best way to get a high-quality photo is to capture it correctly in the first place. AI is great, but it works better when the source material is solid. Before you shoot, take five seconds to check your settings.
- Don’t Fear “Pro” Mode: Most Android phones (and some third-party iOS apps) have a “Pro” or “Manual” mode. You don’t need to be an expert. Simply keeping the ISO low (to reduce grain) or adjusting the Shutter Speed (to freeze motion) gives you massive control.
- Use the Grid: Turn on the 3×3 grid in your settings. Composing with the “Rule of Thirds” instantly makes shots look more professional.
- Check Your Resolution: Ensure your camera is set to maximum resolution and the native aspect ratio (usually 4:3). Some phones default to “Full Screen” (16:9 or 18:9), which actually crops the sensor and lowers quality.
Method 3: Use Your Phone’s Built-in Gallery
For everyday photos, you don’t need complex software. Your phone’s native gallery (Google Photos on Android or the Photos app on iPhone) is often enough.
- The “Auto” Button: Open your photo and tap Edit. Then, look for the “Auto” or “Enhance” button (often a magic wand icon). With one tap, it balances exposure and color. It’s surprisingly effective for 90% of casual photos.
- Basic Tweaks: If the auto-fix isn’t perfect, use the sliders to boost “Brightness” or “Pop.” It’s the fastest way to make a photo share-ready without installing anything new.
Method 4: Use Advanced Apps like Snapseed or Lightroom
If you want your photos to look professionally edited, or if you need to fix specific technical issues like noise, you need dedicated apps. Snapseed (by Google) and Adobe Lightroom Mobile are the industry standards.
Unlike the basic gallery, these tools offer deep control where it matters most:
- Structure & Detail: Instead of a generic “sharpness” filter, Snapseed offers a “Structure” tool. It brings out the texture in objects (like fabric or stone) making the image look crisp and full of detail.
- Superior Noise Reduction: Lightroom repairs the original photo data without adding fake details. You get precise control with sliders: you can smooth out the noise completely or keep a little grain for a natural, cinematic look.
- Selective Editing: Want to brighten just a face while keeping the background moody? These apps let you use masks or brushes to edit specific parts of the image.
The Bottom Line: Which Tool Do You Need?
- To save blurry or low-quality shots without any skills: Use AI tools like Artguru.
- To start with better raw material: Check your Camera Settings (Resolution & Pro Mode).
- For instant color and brightness boosts: Use the Auto-Enhance in Google Photos/iOS Photos.
- For precise editing and artistic control: Dive into Snapseed or Lightroom.
Now you have the toolkit. Go through your gallery and see which “ruined” photos you can bring back to life!